はじめに
- はてなブログをAmplify+Nextjs環境に移行するためにまず初めに環境構築を行う。
Amplify CLI のインストール
npm install -g @aws-amplify/cli
AWSアカウントの紐付け
amplify configure
- リージョンの選択
Follow these steps to set up access to your AWS account:

Sign in to your AWS administrator account:
https://console.aws.amazon.com/
Press Enter to continue

Specify the AWS Region
? region:
  us-west-2
  eu-north-1
  eu-west-1
❯ eu-west-2
  eu-west-3
  eu-central-1
  ap-northeast-1
(Move up and down to reveal more choices)
- ユーザー名が聞かれますがEnterを押す
? user name:  amplify-mdjVQ
Complete the user creation using the AWS console
アカウントの作成
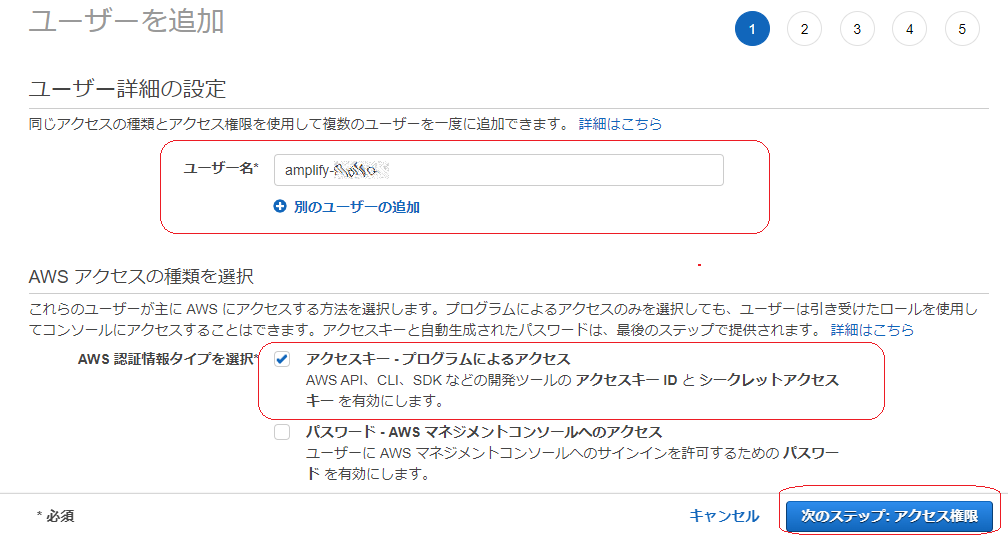
-ユーザー名「amplify-XXXXX(ランダム文字列)」 - アクセスの種類「プログラムによるアクセスのみ許可」

ポリシー名「AdministratorAccess-Amplify」を選択する
タグの追加は何か指定する必要があれば

内容を確認して問題なければ「ユーザーの作成」をクリックします。

ユーザーの作成が完了しました。 表示されているアクセスキー情報を使用してターミナルでIAMユーザーを設定していきます。

amplifyのCLIの設定
- アカウント作成時に発行されたアクセスキー、シークレットアクセスキー、ユーザー名を入力するし、設定完了
Enter the access key of the newly created user:
? accessKeyId:  ********************
? secretAccessKey:  ****************************************
This would update/create the AWS Profile in your local machine
? Profile Name:  amplify-xxxxxx
Amplifyの初期化
amplify init

? Enter a name for the project 【example-project-name】
The following configuration will be applied:

Project information
| Name: winlogic
| Environment: dev
| Default editor: Visual Studio Code
| App type: javascript
| Javascript framework: none
| Source Directory Path: src
| Distribution Directory Path: dist
| Build Command: npm run-script build
| Start Command: npm run-script start

? Initialize the project with the above configuration? 【No】
? Enter a name for the environment 【dev】
? Choose your default editor: 【Visual Studio Code】
? Choose the type of app that you're building 【javascript】
Please tell us about your project
? What javascript framework are you using 【react】
? Source Directory Path:  【src】
? Distribution Directory Path: 【.next】
? Build Command: 【npm run-script build】
? Start Command: 【npm run-script start】
Using default provider  awscloudformation
? Select the authentication method you want to use: 【AWS profile】
amplifyのホスティングの追加
$ amplify add hosting
? Select the plugin module to execute 【Hosting with Amplify Console (Managed hosting with custom】 domains, Continuous deployment)
? Choose a type 【Continuous deployment (Git-based deployments)】
? Continuous deployment is configured in the Amplify Console. Please hit enter once you connect your repository


amplifyのデプロイ用ロールが作成される

「パッケージバージョンの上書きを追加」ボタンを押して「nextjs version」を選択してバージョンに「latest」を指定して次へボタンをクリックする


デプロイ開始
- デプロイ開始から15分後にデプロイ完了

参考にしたサイト
- 下記の2つの記事を読めば、ほぼできる