はじめに
サンプルコード
import 'dart:ui';
import 'dart:async';
import 'package:flutter/material.dart';
import 'package:iterative_memory/widget/button_widget.dart';

class TimerPage extends StatefulWidget {
  @override
  _TimerPageState createState() => _TimerPageState();

}

class _TimerPageState extends State<TimerPage> {
  final player = AudioPlayer();

  //static const defaultSeconds = 10;
  int maxSeconds = 10;
  int seconds = 10;
  Timer? timer;

  void startTimer({bool reset = true}) {
    if (reset) {
      resetTimer();
    }
    // seconds: 1
    timer = Timer.periodic(Duration(seconds: 1), (_){
      if (seconds > 0) {
        setState(() => seconds--);
      } else {
        stopTimer(reset: false);
        seconds = maxSeconds;
      }
    });
  }

  void resetTimer() => setState(() => seconds = maxSeconds);

  void stopTimer({bool reset = true}) {
    if (reset) {
      resetTimer();
    }
    setState(() => timer?.cancel());
  }

  @override
  Widget build(BuildContext context) => Scaffold(
      body: Container(
          width: double.infinity,
          color: Colors.deepPurpleAccent,
          child: Column(
            mainAxisAlignment: MainAxisAlignment.center,
            children: [
              buildTimer(),
              const SizedBox(height: 80),
              buildButtons()
            ],
          )
      ));

  Widget buildButtons() {
    final isRunning = timer == null ? false : timer!.isActive;
    final isCompleted = seconds == maxSeconds || seconds == 0;
    final timeController = TextEditingController();

    return isRunning || !isCompleted ? Row(
        mainAxisAlignment: MainAxisAlignment.center,
        children: [
          ButtonWidget(
              text: isRunning ? '停止' : '再開',
              onClicked: () {
                if (isRunning) {
                  stopTimer(reset: false);
                } else {
                  startTimer(reset: false);
                }
              }),
          const SizedBox(width: 12),
          ButtonWidget(text: '初めから', onClicked: () {
            resetTimer();
          })
        ]
    ) : Column(
      mainAxisAlignment: MainAxisAlignment.center,
      children: [
        TextField(
          decoration: InputDecoration(
              fillColor: Colors.white,
              filled: true,
              border: OutlineInputBorder(),
              hintText: '秒数を入力してください'
          ),
          keyboardType: TextInputType.number,
          autofocus: true,
          controller: timeController,
        ),
        ButtonWidget(
          text: 'スタート',
          color: Colors.black,
          backgroundColor: Colors.white,
          onClicked: () {
            maxSeconds =  int.parse(timeController.text);
            startTimer();
          },
        ),
      ]
    );
  }

  Widget buildTimer() => SizedBox(
      width: 200,
      height: 200,
      child: Stack(
        fit: StackFit.expand,
        children: [
          CircularProgressIndicator(
            value: 1 - seconds / maxSeconds,
            valueColor: AlwaysStoppedAnimation(Colors.white),
            strokeWidth: 12,
            backgroundColor: Colors.greenAccent,
          ),
          Center(child: buildTime(),)
        ],
      )
  );

  Widget buildTime() {
    return Text(
        '$seconds',
        style: TextStyle(
            fontWeight: FontWeight.bold,
            color: Colors.white,
            fontSize: 80
        )
    );
  }
}
- Buttonを共通化するためにcomponent化
import 'package:flutter/material.dart';

class ButtonWidget extends StatelessWidget {
  final String text;
  final VoidCallback onClicked;

  var backgroundColor;
  var color;

  ButtonWidget({
    Key? key,
    required this.text,
    this.color = Colors.white,
    required this.onClicked,
    this.backgroundColor = Colors.black,
  }) : super(key: key) {

  }

  @override
  Widget build(BuildContext context) => ElevatedButton(
    style: ElevatedButton.styleFrom(
      primary: backgroundColor,
      padding: EdgeInsets.symmetric(horizontal: 32,vertical: 16)
    ),
    onPressed: onClicked,
    child: Text(
      text,
      style: TextStyle(fontSize: 20, color: color)
    ),
  );

}
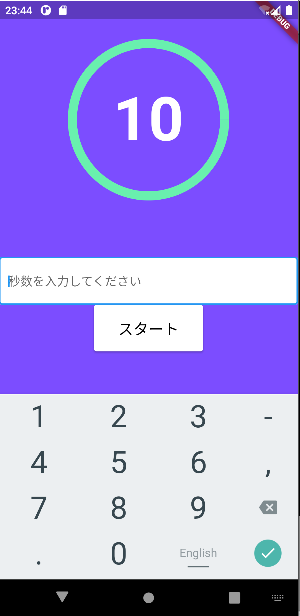
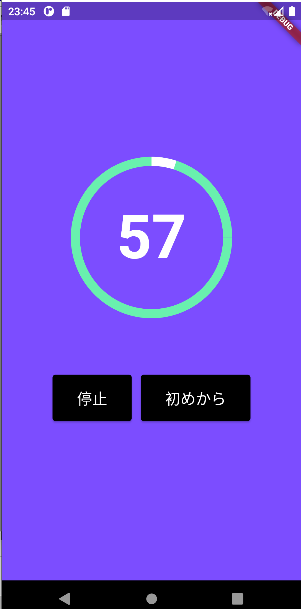
画面イメージ