フリーランス 技術調査ブログ

フリーランス/エンジニア Ruby Python Nodejs Vuejs React Dockerなどの調査技術調査の備忘録

amplifyの環境でエラーが発生したので再度新しくサイトを構築

はじめに

  • amplifyの開発を進めていたが、デプロイ時のエラーをどうしても解決できず、1度環境を壊して再構築した。

windowsのwsl環境で開発しております。

ローカルのnodejsを削除とインストール

  • 環境を最新にする
sudo apt-get update
  • nodejsアンインストール
npm uninstall -g npm
sudo apt-get remove nodejs
  • nvm削除
rm -rf $NVM_DIR

-nvm install

curl -o- https://raw.githubusercontent.com/nvm-sh/nvm/v0.39.1/install.sh | bash
※v.039.1の箇所は最新バージョンを指定するようにする

nvm install node

Amplify Setup Instructions

STEP1 amplify configure

$  amplify configure
? region:  ap-northeast-1
? user name:  (amplify-vINdB) <specify any user name>
※Here open browser.AWS Console setting completely.Complete the configuration in the AWS Console.
? accessKeyId:  ********************
? secretAccessKey:  ****************************************
? Profile Name:  <specify any user name>

STEP2 amplify init

$ amplify init
? Initialize the project with the above configuration? [No]
? Enter a name for the environment [prod]
? Choose your default editor: [Visual Studio Code]
? Choose the type of app that you're building [javascript]
Please tell us about your project
? What javascript framework are you using [react]
? Source Directory Path:  [src]
? Distribution Directory Path: [.next]
? Build Command: [npm run-script build]
? Start Command: [npm run-script start]
Using default provider  awscloudformation
? Select the authentication method you want to use: [AWS profile]

STEP3 amplify add api

$ amplify add api
? Select from one of the below mentioned services: [GraphQL]
? Here is the GraphQL API that we will create. Select a setting to edit or continue [Continue]
? Choose a schema template: [One-to-many relationship (e.g., “Blogs” with “Posts” and “Comments”)]
✔ Do you want to edit the schema now? (Y/n) · [yes]

下記のように既存のschemaを変更してみた。

input AMPLIFY { globalAuthRule: AuthRule = { allow: public } } # FOR TESTING ONLY!

type Blog @model {
  id: ID!
  name: String!
  posts: [Post] @hasMany
  categories: [Category] @hasMany
}

type Category @model {
  id: ID!
  name: String!
  isPublished: Boolean!
  blog: Blog @belongsTo
  post: Post @belongsTo
}

type Post @model {
  id: ID!
  title: String!
  body: String!
  created_at: AWSDateTime!
  updated_at: AWSDateTime!
  isPublished: Boolean!
  blog: Blog @belongsTo
  categories: [Category] @hasMany
  comments: [Comment] @hasMany
}

type Comment @model {
  id: ID!
  post: Post @belongsTo
  content: String!
}

STEP4 amplify push

$ amplify push
? Are you sure you want to continue? [Yes]
? Do you want to generate code for your newly created GraphQL API [Yes]
? Choose the code generation language target [typescript]
? Enter the file name pattern of graphql queries, mutations and subscriptions [src/graphql/**/*.ts]
? Do you want to generate/update all possible GraphQL operations - queries, mutations and subscriptions [Yes]
? Enter maximum statement depth [increase from default if your schema is deeply nested] [5] ※デフォルトは2だが、念のため5階層に
? Enter the file name for the generated code [src/API.ts]

# This "input" configures a global authorization rule to enable public access to
# all models in this schema. Learn more about authorization rules here: https://docs.amplify.aws/cli/graphql/authorization-rules
input AMPLIFY { globalAuthRule: AuthRule = { allow: public } } # FOR TESTING ONLY!

STEP5 amplify hosting add

✔ Select the plugin module to execute · [Hosting with Amplify Console (Managed hosting with custom domains, Continuous deployment)]
? Choose a type [ Continuous deployment (Git-based deployments)]
※The browser starts up here.

STEP6 amplify publish

? Are you sure you want to continue? Yes

参考文献

docs.aws.amazon.com

https://docs.amplify.aws/cli/teams/overview/

blog.serverworks.co.jp

www.ragate.co.jp

blog.serverworks.co.jp

serverless.co.jp

docs.aws.amazon.com

qiita.com

PHPでTwilioを利用してSMSメールを送信する

はじめに

PHPでSMSメール送信できなかと相談を受けて調べてみた。

SMSサービス

  • いろいろな企業がサービスを提供しているが、No1シェアだった理由と、日本の電話番号も対応していたので、こちらを試してみました。 www.peerspot.com

無料で利用できるものあったがフランスの番号などで日本の番号が使えなそうなので、却下。

トライアル用番号を発行する

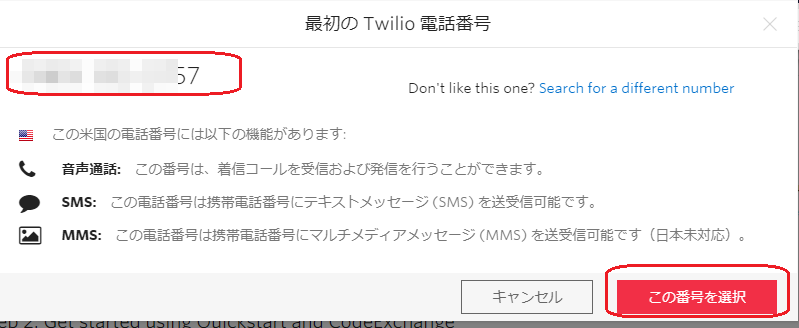
  • トライアル用の電話番号が発行される。指定された以外の電話番号も選択可能だが、料金がかかるので、ここは素直に無料の電話番号を取得する

  • 作成完了すると下記の画面が表示される

install

composer require twilio/sdk

SMS送信処理

  • 下記のコードだけで送信可能。
    require_once "vendor/autoload.php";
    use Twilio\Rest\Client;

    $inputTel = '09012345678';

    $account_sid = '<管理画面で表示されているaccount_sidをコピペ>';
    $auth_token = '<管理画面で表示されているauth_tokenをコピペ>';
    $twilio_number = "+19xxxxxxxxx"; // 試用期間に利用できる電話番号を指定

    // ここで 09012345678 の番号を 「+819012345678」に変更する
    $sentNumber = '+81'.substr($inputTel,1);

    $body = "ほげほげほげほげほげ\n\n" .
            "ほげほげほげほげほげ\n\n" .
            "ほげほげほげほげほげ。\n\n";

    $result = $client->messages->create(
            $sentNumber,
            array(
                'from' => $twilio_number,
                'url' => ["https://simtest.starpaint-office.jp/lp/result.php?uid=".$uuid],
                'body' => $body
            )
        );

トライアル期間の注意事項

  • 500円の枠しか利用できないので、15~20通ぐらい送信したらすぐに利用枠が使えなくなる。

トライアルの注意事項

Nuxtjs+typescriptにjestを設定する

Summary

  • nextjs+typescript環境にjestをインストールする機会があったので、設定した手順をメモしておく。

install

npm install @nuxtjs/dotenv
npm install --save-dev jest @types/jest  ts-jest

setting

  • package.jsonファイルに下記の記述を追記する
  "scripts": {
      ...,
     "test": "jest --runInBand"
      ...,
  }
  • app/tsconfig.jsonファイルに下記の記述を追加する
"compilerOptions": {
    ...,
    "types": ["...", "@types/jest"],
    ....
  },

jestの初期化

  • jest.js --initをコマンドを実行する
 ./node_modules/jest/bin/jest.js --init
  • 「構成ファイルにTypescriptを使用しますか? ›(y / N)」と聞かれるので、ここはyesと入力して下さい。
 ? Would you like to use Typescript for the configuration file? › (y/N)
  • nodeを選択する
? Choose the test environment that will be used for testing › - Use arrow-keys. Return to submit.
❯   node
    jsdom (browser-like)
  • 「? Jestにカバレッジレポートを追加しますか? ›(y / N)」と聞かれるので、やっぱりyesと入力して下さい。
? Do you want Jest to add coverage reports? › (y/N) ←レポートが欲しければ y
  • 「?カバレッジ用のコードを計測するためにどのプロバイダーを使用する必要がありますか? 」と聞かれているので、とりあえず「v8」を選択する
? Which provider should be used to instrument code for coverage? › - Use arrow-keys. Return to submit.
❯   v8
    babel

(参考文献)※nodeのバージョンが14のため、v8を選択する

https://jestjs.io/ja/docs/configuration#coverageprovider-string

  • 「?すべてのテストの間にモックコールとインスタンスを自動的にクリアしますか? ›(y / N)」と聞かれているので、「N」を選択する
? Automatically clear mock calls and instances between every test? › (y/N) 

上記の設定を手順を行うと「jest.config.ts」にファイルが作成される

jest.config.tsファイルの設定

(変更前)
  // preset: undefined,
(変更後)
  preset: "ts-jest",

(変更前)
  // setupFiles: [],
(変更後)
  setupFiles: ["/root/tests/setup-tests.ts"],

(変更前)
  // globals: {},
(変更後)
  globals: {
    'ts-jest': {
        isolatedModules: true
    }
  },

(変更前)
  // collectCoverageFrom: undefined,
(変更後)
  collectCoverageFrom: [
    '**/*.{ts,tsx}',
    '!**/*.d.ts',
    "!**/node_modules/**",
    "!**/vendor/**"
  ],
  • `tests/setup-tests.ts'ファイルを作成する。上記の作成した.envファイルを読み込む
import dotenv from 'dotenv';

dotenv.config({ path: '.env' });

(参考文献)

https://stackoverflow.com/questions/50259025/using-env-files-for-unit-testing-with-jest https://www.adoclib.com/blog/access-process-env-property-when-testing-nuxt-js-app-with-jest.html

Test execution command

npm test

Expressの全ルートを一覧表示する方法を調べる

Summary

  • expressに記述している複数のルーティングを一括でテキストまたはjsonに出力できないか調べてみました。

References

github.com

Example Code

  • 下記のコードで記述するとPath及びPathに紐づくメソッド名が取得できる。
router.stack.filter(r => r.route).map(r=> { 
 return {"path":r.route.path, "methods":r.route.methods}
})
  • ExpressのAPI経由でPathとメソッドの情報を取得した場合
router.get('/test', function (req, res) {
    res.json({
        route: router.stack.filter(r => r.route)
           .map(r=> { return {"path":r.route.path,
"methods":r.route.methods}}),
      });
})
  • Pathとメソッドの情報を取得した情報をswagger.yamlの形式で出力した場合。(swagger.yamlのpaths部分をのみ出力するイメージ。ただし必要最低限のみ)
## 上記のAPIで取得したjsonの値を変数にセットする
const rowJson = "出力したJSON"
const fs = require('fs');    

let swggerJson = ''
for (const json of rowJson['route']) {
  console.log(json.path)
  console.log(Object.keys(json.methods)[0])
  const url = json.path
  const params = url.split(':')
  if (params[1]) {
swggerJson = swggerJson + `
  ${params[0]}{${params[1].replace(':', '')}}:
    ${Object.keys(json.methods)[0]}:
      summary: テストテストテスト
`
  } else {
swggerJson = swggerJson + `
  ${json.path}:
    ${Object.keys(json.methods)[0]}:
      summary: テストテストテスト
`
  }
    if (Object.keys(json.methods)[0] === 'post') {
swggerJson = `${swggerJson}
      requestBody:
        content:
          application/json:
            schema:
              type: object
      responses:
        "200":
          description: ok
`
    } else {
      if (params[1]) {
swggerJson = `${swggerJson}
      parameters:
        - name: "${params[1]}"
          in: "path"
          schema:
            type: "integer"
          description: "${params[1]}パラメータを取得する"
          required: true
      responses:
        '200':
          description: OK
          content:
            text/plain:
              schema:
                type: string        
`
      } else {
swggerJson = `${swggerJson}
    responses:
      '200':
        description: OK
        content:
          text/plain:
            schema:
              type: string        
`        
      }
    }
}

fs.writeFile('test.txt', swggerJson, function (err: any) {
if (err) { throw err; }
console.log('test.txtが作成されました');
});

Conclusion

  • わざわざ自作しせずに自動でexpressで記述したルーティングをswagger.yamlに出力してくれるツールがあると便利だったのですが、自分が探したところでは上手く動作してくれるツールや既存のコードに手を咥えないと使えないライブラリとかしかなかったので、一時的に手動で出力できるコードを書きました。

Kaggle Tabular Playground Series - Mar 2022 コンペに参加してみた

はじめに

データ分析・前処理

  • xは0,1,2の3種類だったので、カテゴリ変数の扱いにしてOne-Hotエンコーディングを行ってみて。
  • yは0,1,2,3の4種類だったので、カテゴリ変数の扱いにしてOne-Hotエンコーディングを行ってみて。
  • timeは年、月、日、時、分で分けるが、説明変数として時間と分と曜日で利用した。  テストデータが、とある日の月曜日分のデータしかなかったため。
  • directionも、カテゴリ変数の扱いにしてOne-Hotエンコーディングを行ってみて。
  • 欠損値は存在しなかったので、何も対応していない。
  • 外れ値もなさそうなので、何も対応していない。
  • 目的変数と、その他のデータに相関関係があまりなさそうに見えたので、ほとんどの項目を説明変数にした

モデル構築時

  • 説明変数は,x,y,時間,分,directionを使った。
  • 線形回帰モデルとXGBoost回帰モデルを作成して、XGBoost回帰で作成したほうが精度はよかった。  kaggleの順位は線形回帰モデル(700位)とXGBoost回帰モデル(405位)になった

よくわからず進めたところ

  • XGBoostのハイパーパラメータは参考サイトをコピペして利用した。  XGBoostのサンプルを探していたときに、最初分類のサンプルに気づかず分類の記述方法をしていたが、回帰の書き方を  見つけて、調査に遠回りした。
  • ハイパーパラメータの生成するのに1時間以上掛かったのがよくわからず、もっと早く生成できないものかと思いました。
  • 学習する際に月曜日のデータだけに絞ってテストしたほうがよかったのかなぁと思いました。テストデータが月曜日のデータしかなかったので。
  • グラフを使いこなせないので、グラフでデータの可視化をしなかった。可視化してデータを見れるようにしたい

コンペ時に利用したコード

import math
import pandas as pd
import matplotlib.pyplot as plt
import seaborn as sns
import numpy as np
import xgboost as xgb
import optuna
from datetime import datetime as dt
from sklearn.linear_model import LinearRegression
from sklearn.model_selection import train_test_split
from sklearn.metrics import mean_squared_error
from sklearn.model_selection import GridSearchCV
from sklearn.metrics import make_scorer
from sklearn.preprocessing import LabelEncoder 
from sklearn.model_selection import cross_val_score

#現在の最大表示列数の出力
pd.get_option("display.max_columns")

#最大表示列数の指定(ここでは50列を指定)
pd.set_option('display.max_columns', 50)

## データの読み込み
train = pd.read_csv("train.csv")
test = pd.read_csv("test.csv")

## 欠損値の確認
train.isnull().sum()
## directionのデータの確認
train.groupby('direction').size()

def objective(trial,df_X,df_y):
    #評価するハイパーパラメータの値を規定
    params ={
        'max_depth':trial.suggest_int("max_depth",1,10),
        'min_child_weight':trial.suggest_int('min_child_weight',1,5),
        'gamma':trial.suggest_uniform('gamma',0,1),
        'subsample':trial.suggest_uniform('subsample',0,1),
        'colsample_bytree':trial.suggest_uniform('colsample_bytree',0,1),
        'reg_alpha':trial.suggest_loguniform('reg_alpha',1e-5,100),
        'reg_lambda':trial.suggest_loguniform('reg_lambda',1e-5,100),        
        'learning_rate':trial.suggest_uniform('learning_rate',0,1)}

    model = xgb.XGBRegressor(n_estimators=10,
                            verbosity=0,
                            n_jobs=-1,
                            random_state=0,
                            **params)

    #交差検証
    scores = cross_val_score(model, df_X, df_y, scoring='neg_mean_squared_error',cv=5)
    score_mean = -1 * np.mean(scores)

    return score_mean

## データ前処理
def pre_data(df):
  ## 日時を月、日、時、分、週に分割
  df_date_time = pd.DataFrame({'datetime': pd.to_datetime(df['time'])})
  df['Month'] = df_date_time['datetime'].dt.month
  df['Day'] = df_date_time['datetime'].dt.day
  df['Hour'] = df_date_time['datetime'].dt.hour
  df['Minute'] = df_date_time['datetime'].dt.minute 
  df['Week'] = df_date_time['datetime'].dt.strftime('%A')
  
  ## One-hot-Encoding
  df = pd.concat([df, pd.get_dummies(df['x'],prefix='x'),pd.get_dummies(df['y'],prefix='y'), pd.get_dummies(df['direction']), pd.get_dummies(df['Week'])], axis=1)
  ## 不要なカラムを削除
  df = df.drop(columns=['time', 'direction', 'Week'])

  ## 月曜日データのみ抽出。
  ## テストデータが月曜日だけのため。
  #train = train[train['Monday'] == 1]
  return df

## 1時間以上経過して生成されたハイパーパラメータ
## {'max_depth': 10, 'min_child_weight': 3, 'gamma': 0.8627614678291173, 'subsample': 0.9488395992082753, 'colsample_bytree': 0.9978454006405445, 'reg_alpha': 0.00048624833228949274, 'reg_lambda': 0.00016168213697343028, 'learning_rate': 0.6462794245516749}
def create_hyperparameter(X, y):
  study = optuna.create_study()
  #studyインスタンスのoptimize()に作った関数を渡して最適化する。
  study.optimize(lambda trial: objective(trial,X,y), n_trials=100)
  print(study.best_params)    
  print(study.best_value)  
  return study.best_params

## 線形回帰モデル(個人的な最大スコア:0.23 / kaggle : 700/756位)
def create_linear_regression_model(df):
  # 説明変数
  #target= ['x_0','x_1','x_2','y_0','y_1','y_2','y_3','Hour','Minute','EB','NB','NE','NW','SB','SE','SW','WB','Friday','Monday','Saturday','Sunday','Thursday','Tuesday','Wednesday']
  target= ['x_0','x_1','x_2','y_0','y_1','y_2','y_3','Hour','Minute','EB','NB','NE','NW','SB','SE','SW','WB','Monday']
  x = df[target].values
  # 目的変数
  y = train['congestion'].values
  # 学習データ/テストデータ分割
  # 訓練データ: 70% / テストデータ: 30%
  X_train, X_test, y_train, y_test = train_test_split(x, y, test_size=0.3, random_state=0)

  # 重回帰のインスタンス
  model = LinearRegression()

  # モデル学習
  model.fit(X_train, y_train)

  # 予測値(学習データ)
  y_train_pred = model.predict(X_train)

  # 学習データの結果
  print("##学習データの結果")
  print(model.coef_)  #回帰変数の表示
  print(model.intercept_)  #回帰直線の切片
  print(model.get_params())  #パラメータの取得
  print(model.predict(X_test))  #予測値の表示
  print(model.score(X_train,y_train))  #決定係数の表示

  # 予測値(テストデータ)
  y_test_pred  = model.predict(X_test)

  # テストデータの結果
  print("##テストデータの結果")
  print(model.coef_)  #回帰変数の表示
  print(model.intercept_)  #回帰直線の切片
  print(model.get_params())  #パラメータの取得
  print(model.predict(X_test))  #予測値の表示
  print(model.score(X_test,y_test))  #決定係数の表示

  return model

def create_xgb_model(df):
  # 説明変数
  #target= ['x_0','x_1','x_2','y_0','y_1','y_2','y_3','Hour','Minute','EB','NB','NE','NW','SB','SE','SW','WB','Friday','Monday','Saturday','Sunday','Thursday','Tuesday','Wednesday']
  target= ['x_0','x_1','x_2','y_0','y_1','y_2','y_3','Hour','Minute','EB','NB','NE','NW','SB','SE','SW','WB','Monday']
  #x = df[target].values
  # 目的変数
  #y = train['congestion'].values

  # 目的変数
  y = df["congestion"].values
  # 説明変数
  x = df[target].values

  X_train, X_test, y_train, y_test = train_test_split(x, y, test_size=0.3, random_state=100, stratify=y)
  # ハイパーパラメータを生成 1時間以上経過してようやく生成された
  #params = create_hyperparameter(X_train,y_train)

  # 上記で取得したパラメータをXGBRegressorの引数に指定する
  grid_xgb_reg = xgb.XGBRegressor(max_depth=10, min_child_weight=3, gamma=0.8627614678291173, subsample=0.9488395992082753, colsample_bytree=0.9978454006405445, reg_alpha=0.00048624833228949274, reg_lambda=0.00016168213697343028, learning_rate=0.6462794245516749)
  grid_xgb_reg.fit(X_train, y_train)

  y_train_pred = grid_xgb_reg.predict(X_train)
  y_test_pred = grid_xgb_reg.predict(X_test)

  # 裁量スコアとなるパラメータ値を出力
  #print(grid_xgb_reg.best_score_)
  print(y_train_pred)
  print(y_test_pred)
  
  return grid_xgb_reg


## メイン
train = pre_data(train)
# 重回帰モデル 700位の結果
#model = create_linear_regression_model(train)

# xgboostモデル 405位の結果 
model = create_xgb_model(train)

## 検証データでモデルの評価
test = pre_data(test)
target= ['x_0','x_1','x_2','y_0','y_1','y_2','y_3','Hour','Minute','EB','NB','NE','NW','SB','SE','SW','WB','Monday']
x = test[target].values
result = model.predict(x)
test['congestion'] = result

## 提出用CSVファイル生成
test[['row_id','congestion']].to_csv('submission.csv', index = False)

参考文献

## 参考文献
# https://ohke.hateblo.jp/entry/2019/02/16/230000
# LabelEncoder
# https://note-tech.com/table_preprocess_summary/
# ロジット変換
# https://uribo.github.io/practical-ds/02/numeric.html
# 層化抽出: 引数stratify
# https://note.nkmk.me/python-sklearn-train-test-split/
# 【初心者】コピペでできるXGBoost回帰(※分類だった)
# https://dataanablog.com/xgboost-regression-that-can-be-done-by-copy-and-paste/
# XGBoost 回帰サンプル
# https://dataanablog.com/xgboost-regression-that-can-be-done-by-copy-and-paste/
# optuna
# https://qiita.com/mamorous3578/items/912f1a2be0e9da7e9140
# Optunaを使ったXGBoostのハイパーパラメータ最適化
# https://datadriven-rnd.com/optuna_xgboost/
# XGBoostについて(ハイパーパラメータ最適化)
# https://datadriven-rnd.com/2021-01-23-161630/

参考文献

- LabelEncoder
https://note-tech.com/table_preprocess_summary/
- ロジット変換
https://uribo.github.io/practical-ds/02/numeric.html
- 層化抽出: 引数stratify
https://note.nkmk.me/python-sklearn-train-test-split/
- 【初心者】コピペでできるXGBoost回帰(※分類だった)
https://dataanablog.com/xgboost-regression-that-can-be-done-by-copy-and-paste/
- XGBoost 回帰サンプル
https://dataanablog.com/xgboost-regression-that-can-be-done-by-copy-and-paste/
- optuna
https://qiita.com/mamorous3578/items/912f1a2be0e9da7e9140
- Optunaを使ったXGBoostのハイパーパラメータ最適化
https://datadriven-rnd.com/optuna_xgboost/
- XGBoostについて(ハイパーパラメータ最適化)
https://datadriven-rnd.com/2021-01-23-161630/

コンペ参加結果

  • 405位でした。

Amplify+Nextjs環境構築

はじめに

  • はてなブログをAmplify+Nextjs環境に移行するためにまず初めに環境構築を行う。

Amplify CLI のインストール

npm install -g @aws-amplify/cli

AWSアカウントの紐付け

 amplify configure
  • リージョンの選択
Follow these steps to set up access to your AWS account:

Sign in to your AWS administrator account:
https://console.aws.amazon.com/
Press Enter to continue

Specify the AWS Region
? region:
  us-west-2
  eu-north-1
  eu-west-1
❯ eu-west-2
  eu-west-3
  eu-central-1
  ap-northeast-1
(Move up and down to reveal more choices)
  • ユーザー名が聞かれますがEnterを押す
? user name:  amplify-mdjVQ
Complete the user creation using the AWS console

アカウントの作成

f:id:PX-WING:20220310235458p:plain

-ユーザー名「amplify-XXXXX(ランダム文字列)」 - アクセスの種類「プログラムによるアクセスのみ許可」

f:id:PX-WING:20220310235852p:plain

  • ポリシー名「AdministratorAccess-Amplify」を選択する

  • タグの追加は何か指定する必要があれば f:id:PX-WING:20220316204632p:plain

  • 内容を確認して問題なければ「ユーザーの作成」をクリックします。 f:id:PX-WING:20220316204914p:plain

  • ユーザーの作成が完了しました。 表示されているアクセスキー情報を使用してターミナルでIAMユーザーを設定していきます。 f:id:PX-WING:20220316205447p:plain

amplifyのCLIの設定

  • アカウント作成時に発行されたアクセスキー、シークレットアクセスキー、ユーザー名を入力するし、設定完了
Enter the access key of the newly created user:
? accessKeyId:  ********************
? secretAccessKey:  ****************************************
This would update/create the AWS Profile in your local machine
? Profile Name:  amplify-xxxxxx

Amplifyの初期化

amplify init

? Enter a name for the project 【example-project-name】
The following configuration will be applied:

Project information
| Name: winlogic
| Environment: dev
| Default editor: Visual Studio Code
| App type: javascript
| Javascript framework: none
| Source Directory Path: src
| Distribution Directory Path: dist
| Build Command: npm run-script build
| Start Command: npm run-script start

? Initialize the project with the above configuration? 【No】
? Enter a name for the environment 【dev】
? Choose your default editor: 【Visual Studio Code】
? Choose the type of app that you're building 【javascript】
Please tell us about your project
? What javascript framework are you using 【react】
? Source Directory Path:  【src】
? Distribution Directory Path: 【.next】
? Build Command: 【npm run-script build】
? Start Command: 【npm run-script start】
Using default provider  awscloudformation
? Select the authentication method you want to use: 【AWS profile】

amplifyのホスティングの追加

$ amplify add hosting
? Select the plugin module to execute 【Hosting with Amplify Console (Managed hosting with custom】 domains, Continuous deployment)
? Choose a type 【Continuous deployment (Git-based deployments)】
? Continuous deployment is configured in the Amplify Console. Please hit enter once you connect your repository

f:id:PX-WING:20220316220822p:plain

f:id:PX-WING:20220316221533p:plain

f:id:PX-WING:20220316221936p:plain

f:id:PX-WING:20220316222136p:plain

f:id:PX-WING:20220316222330p:plain

f:id:PX-WING:20220316222450p:plain

  • amplifyのデプロイ用ロールが作成される f:id:PX-WING:20220316222735p:plain

  • 「パッケージバージョンの上書きを追加」ボタンを押して「nextjs version」を選択してバージョンに「latest」を指定して次へボタンをクリックする f:id:PX-WING:20220316223249p:plain

f:id:PX-WING:20220316223605p:plain

デプロイ開始

  • デプロイ開始から15分後にデプロイ完了 f:id:PX-WING:20220316231311p:plain

参考にしたサイト

  • 下記の2つの記事を読めば、ほぼできる

dev.classmethod.jp

dev.classmethod.jp

DockerでPostgreSQLの環境構築

Docker-Compose

version: "3"
services:
  postgres:
    container_name: "db"
    image: postgres:latest
    restart: always
    environment:
      POSTGRES_USER: test
      POSTGRES_PASSWORD: password
      PGPASSWORD: password123
      POSTGRES_DB: test
      PGDATA: /var/lib/postgresql/data/pgdata
      TZ: "Asia/Tokyo"
    ports:
      - 5432:5432
    volumes:
      - db-pg-data:/var/lib/postgresql/data
    networks:
      - test-network
  pgadmin:
    image: dpage/pgadmin4
    restart: always
    ports:
      - 8080:80
    environment:
      PGADMIN_DEFAULT_EMAIL: test@example.com
      PGADMIN_DEFAULT_PASSWORD: password
    volumes:
      - admin-data:/var/lib/pgadmin
    networks:
      - test-network
networks:
  test-network:
    driver: bridge
volumes:
  db-pg-data:
  admin-data: