フリーランス 技術調査ブログ

フリーランス/エンジニア Ruby Python Nodejs Vuejs React Dockerなどの調査技術調査の備忘録

Laravelでマイグレーションする

はじめに

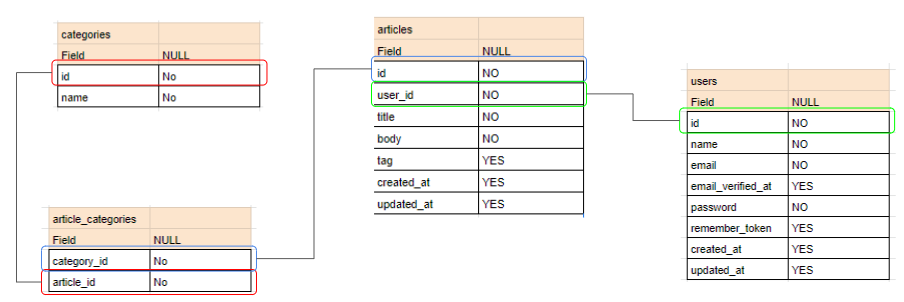
  • Laravelで下記のテーブルを用意する

f:id:PX-WING:20201002230207p:plain

マイグレーションファイルの作成

php artisan make:migration create_categories_table
php artisan make:migration create_articles_table
php artisan make:migration create_article_categories_table

マイグレーションファイルの構成

  • categoriesテーブルのファイル
<?php

use Illuminate\Database\Migrations\Migration;
use Illuminate\Database\Schema\Blueprint;
use Illuminate\Support\Facades\Schema;

class CreateCategoriesTable extends Migration
{
    /**
     * Run the migrations.
     *
     * @return void
     */
    public function up()
    {
        Schema::create('categories', function (Blueprint $table) {
            $table->id();
            $table->string('name');
            $table->timestamps();
        });
    }

    /**
     * Reverse the migrations.
     *
     * @return void
     */
    public function down()
    {
        Schema::dropIfExists('categories');
    }
}
  • articlesテーブルのファイル
<?php

use Illuminate\Database\Migrations\Migration;
use Illuminate\Database\Schema\Blueprint;
use Illuminate\Support\Facades\Schema;

class CreateArticlesTable extends Migration
{
    /**
     * Run the migrations.
     *
     * @return void
     */
    public function up()
    {
        Schema::create('articles', function (Blueprint $table) {
            $table->id();
            $table->unsignedBigInteger('user_id');
            $table->foreign('user_id')->references('id')->on('users')->onDelete('cascade');
            $table->string('title');
            $table->text('body');
            $table->string('tag')->nullable();           
            $table->timestamps();
        });
    }

    /**
     * Reverse the migrations.
     *
     * @return void
     */
    public function down()
    {
        Schema::dropIfExists('articles');
    }
}
  • article_categoriesテーブルのファイル
<?php

use Illuminate\Database\Migrations\Migration;
use Illuminate\Database\Schema\Blueprint;
use Illuminate\Support\Facades\Schema;

class CreateArticleCategoriesTable extends Migration
{
    /**
     * Run the migrations.
     *
     * @return void
     */
    public function up()
    {
        Schema::create('article_categories', function (Blueprint $table) {
            $table->id();
            $table->unsignedBigInteger('category_id');
            $table->foreign('category_id')->references('id')->on('categories')->onDelete('cascade');
            $table->unsignedBigInteger('article_id');
            $table->foreign('article_id')->references('id')->on('articles')->onDelete('cascade');            
            $table->timestamps();
        });
    }

    /**
     * Reverse the migrations.
     *
     * @return void
     */
    public function down()
    {
        Schema::dropIfExists('article_categories');
    }
}

マイグレーション実行

  • migrateコマンドでテーブルを作成する
$  php artisan migrate
Migrating: 2020_10_02_091649_create_categories_table
Migrated:  2020_10_02_091649_create_categories_table (147.28ms)
Migrating: 2020_10_02_091655_create_articles_table
Migrated:  2020_10_02_091655_create_articles_table (228.39ms)
Migrating: 2020_10_02_091659_create_article_categories_table
Migrated:  2020_10_02_091659_create_article_categories_table (404.55ms)

テーブルの作成の確認

  • テーブルも外部制約が付与された状態で作成されている
| categories | CREATE TABLE `categories` (
  `id` bigint(20) unsigned NOT NULL AUTO_INCREMENT,
  `name` varchar(255) COLLATE utf8mb4_unicode_ci NOT NULL,
  `created_at` timestamp NULL DEFAULT NULL,
  `updated_at` timestamp NULL DEFAULT NULL,
  PRIMARY KEY (`id`)
) ENGINE=InnoDB DEFAULT CHARSET=utf8mb4 COLLATE=utf8mb4_unicode_ci |


| articles | CREATE TABLE `articles` (
  `id` bigint(20) unsigned NOT NULL AUTO_INCREMENT,
  `user_id` bigint(20) unsigned NOT NULL,
  `title` varchar(255) COLLATE utf8mb4_unicode_ci NOT NULL,
  `body` text COLLATE utf8mb4_unicode_ci NOT NULL,
  `tag` varchar(255) COLLATE utf8mb4_unicode_ci DEFAULT NULL,
  `created_at` timestamp NULL DEFAULT NULL,
  `updated_at` timestamp NULL DEFAULT NULL,
  PRIMARY KEY (`id`),
  KEY `articles_user_id_foreign` (`user_id`),
  CONSTRAINT `articles_user_id_foreign` FOREIGN KEY (`user_id`) REFERENCES `users` (`id`) ON DELETE CASCADE
) ENGINE=InnoDB DEFAULT CHARSET=utf8mb4 COLLATE=utf8mb4_unicode_ci |


| article_categories | CREATE TABLE `article_categories` (
  `id` bigint(20) unsigned NOT NULL AUTO_INCREMENT,
  `category_id` bigint(20) unsigned NOT NULL,
  `article_id` bigint(20) unsigned NOT NULL,
  `created_at` timestamp NULL DEFAULT NULL,
  `updated_at` timestamp NULL DEFAULT NULL,
  PRIMARY KEY (`id`),
  KEY `article_categories_category_id_foreign` (`category_id`),
  KEY `article_categories_article_id_foreign` (`article_id`),
  CONSTRAINT `article_categories_article_id_foreign` FOREIGN KEY (`article_id`) REFERENCES `articles` (`id`) ON DELETE CASCADE,
  CONSTRAINT `article_categories_category_id_foreign` FOREIGN KEY (`category_id`) REFERENCES `categories` (`id`) ON DELETE CASCADE
) ENGINE=InnoDB DEFAULT CHARSET=utf8mb4 COLLATE=utf8mb4_unicode_ci |

readouble.com

Laravelインストール後のアプリケーションの初期設定

はじめに

Laravelインストール後のアプリケーションの初期設定を下記にまとめる

タイムゾーン / 言語設定

  • 下記の設定を変更して時間を日本時間と言語の設定を日本語にする
config/app.php
@@ -67,7 +67,7 @@ return [
     |
     */

-    'timezone' => 'UTC',
+    'timezone' => 'Asia/Tokyo',

     /*
     |--------------------------------------------------------------------------
@@ -80,7 +80,7 @@ return [
     |
     */

-    'locale' => 'en',
+    'locale' => 'ja',

     /*
     |--------------------------------------------------------------------------

laravel-debugbarインストール

- 下記のコマンドで実行する

$  composer require barryvdh/laravel-debugbar
  • 画面下にデバックバーが表示されることを確認する f:id:PX-WING:20201002081404p:plain

  • デバックバーを非表示にするには.envファイルのAPP_DEBUG=falseに変えると変更する

APP_DEBUG=true

MySQL クライアントのインストール

mariadbの削除

$ yum list installed | grep mariadb
$ sudo yum remove mariadb-libs

mysql clinetのインストールと接続確認

$ sudo yum localinstall -y https://dev.mysql.com/get/mysql80-community-release-el7-3.noarch.rpm
$ sudo yum-config-manager --disable mysql57-community
$ sudo yum-config-manager --enable mysql80-community
$ sudo yum install -y mysql-community-client
$ mysql -h <DBサーバー名> -P 3306 -u <DBアカウント名> -p

laravelのデータベースの設定

  • laravelのconfig/database.phpファイルを下記の記述を作成したデータベースの情報に変更する
DB_CONNECTION=mysql
DB_HOST=127.0.0.1
DB_PORT=3306
DB_DATABASE=laravel
DB_USERNAME=root
DB_PASSWORD=
  • 下記のmigrateコマンドを実行してデータベースに初期で必要なテーブルを作成する
$ php artisan migrate

Migration table created successfully.
Migrating: 2014_10_12_000000_create_users_table
Migrated:  2014_10_12_000000_create_users_table (124.40ms)
Migrating: 2014_10_12_100000_create_password_resets_table
Migrated:  2014_10_12_100000_create_password_resets_table (117.06ms)
Migrating: 2019_08_19_000000_create_failed_jobs_table
Migrated:  2019_08_19_000000_create_failed_jobs_table (174.78ms)
  • 作成したデータベースにテーブルが作成されていることを確認できる
mysql> show tables;
+--------------------+
| Tables_in_winlogic |
+--------------------+
| failed_jobs        |
| migrations         |
| password_resets    |
| users              |
+--------------------+
4 rows in set (0.01 sec)

Windows環境でVS Code Remote SSHを利用してec2環境上で開発する

Windows環境にOpenSSHをインストールする

  • PowerShell用OpenSSHコマンドを下記のサイトからダウンロードする
  • ダウンロード後のファイルを解凍して、自分の好きな場所にファイルを保存する github.com

WindowsのPathを通す(環境設定)

f:id:PX-WING:20201001083956p:plain

SSH設定ファイルを作成する

  • C:\Users\<ユーザー名>\.ssh\フォルダにconfigファイルを作成する
  • configファイルの内容は下記のように設定する
Host <サーバーの名前 またはIPアドレス>
  HostName <サーバーのIPアドレス>
  User ec2-user
  Port 22
  UserKnownHostsFile /dev/null
  PreferredAuthentications publickey
  StrictHostKeyChecking no
  PasswordAuthentication no
  IdentityFile ~/.ssh/<AWSで発行したkeyを指定する>.pem
  IdentitiesOnly yes
  LogLevel FATAL

VSCodeSSHのパスを通す

  • 下記のようにssh.exeのパスを通す f:id:PX-WING:20201001084203p:plain

EC2サーバーに接続する

f:id:PX-WING:20201001084910p:plain

Python モジュールとClassについて

モジュールを作成する

  • モジュールを作成するには、必要なコードを.pyファイル拡張子の付いたファイルに保存するだけ。

サンプル

  • このコードをという名前のファイルに保存します hello.py
def greeting(name):
  print("Hello, " + name)

モジュールを使用する

  • これで、次のimportステートメントを使用して、作成したモジュールを使用できます。
import hello

hello.greeting("山田")

クラスとオブジェクト

クラスを作成する

  • クラスを作成するには、キーワードclass:を使用します。
class MyClass:
  x = 5

オブジェクトの作成

  • これで、MyClassという名前のクラスを使用してオブジェクトを作成できます。
p1 = MyClass()
print(p1.x)

init ()関数

  • すべてのクラスにはinit ()という関数があり、クラスが開始されるときに常に実行されます。
class Person:
  def __init__(self, name, age):
    self.name = name
    self.age = age

p1 = Person("John", 36)

print(p1.name)
print(p1.age)

オブジェクトメソッド

  • オブジェクトにはメソッドを含めることもできます。オブジェクト内のメソッドは、オブジェクトに属する関数です。
class Person:
  def __init__(self, name, age):
    self.name = name
    self.age = age

  def myfunc(self):
    print("Hello my name is " + self.name)

p1 = Person("John", 36)
p1.myfunc()

自己パラメータ

  • selfパラメータは、クラスの現在のインスタンスへの参照であり、そしてクラスに属するアクセス変数に使用されます。
  • 名前selfを付ける必要はありません。好きなように呼び出すことができますが、クラス内の関数の最初のパラメーターである必要があります。
class Person:
  def __init__(mysillyobject, name, age):
    mysillyobject.name = name
    mysillyobject.age = age

  def myfunc(abc):
    print("Hello my name is " + abc.name)

p1 = Person("John", 36)
p1.myfunc()

パスステートメント

  • class定義を空にすることはできませんが、何らかの理由でclass内容のない定義がある場合はpass、エラーが発生しないようにステートメントに入れてください。
class Person:
  pass

Veujsのローカル及びグローバルコンポーネント

グローバル登録

登録後に作成された、全てのルート Vue インスタンス(new Vue)のテンプレート内で使用できることを意味します

ローカル登録

  • グローバル登録は理想的ではありません。例えば Webpack のようなビルドシステムを利用しているときに、グローバルに登録した全てのコンポーネントは、たとえ使用しなくなっても、依然として最終ビルドに含まれてしまうことでしょう。これは、ユーザがダウンロードしなくてはならない JavaScript のファイルサイズを不要に増加させてしまいます。
  • 他のサブコンポーネント内では使用できない ことに注意して下さい

サンプルコード

<!DOCTYPE html>
<html lang='ja'>
<head>
<meta charset='utf-8'>
<script src="https://cdn.jsdelivr.net/npm/vue/dist/vue.js"></script>
<script src="https://cdn.jsdelivr.net/npm/axios/dist/axios.min.js"></script>
</head>
<body>
<div id="app">
    <global-hello your-name="山田太郎"></global-hello>
    <local-hello your-name="山田太郎"></local-hello>
    <counter></counter>
</div>
<script>
Vue.component('global-hello',{
    props: ['yourName'],
    template: '<div>こんにちは、{{yourName}}!</div>'
})
new Vue({
  el: '#app',
    components: {
        'local-hello': {
            props: ['yourName'],
            template: '<div>{{yourName}}ローカル</div>'
        },
        'counter': {
            props:['init'],
            template: '<div>{{ current }}<input type="button" v-on:click="countup" value="+"><input type="button" v-on:click="countdown" value="ー"></div>',
            data: function () {
                return {
                    current: this.init ? this.init : 0
                }
            },
            methods:{
                countup: function(){
                    this.current++;
                },
                countdown: function(){
                    this.current--;
                }            
            }
        }
    }
})
</script>
</body>
</html>

実行結果

f:id:PX-WING:20200928234553p:plain

pythonでGoogletransを利用して翻訳する

はじめに

  • Googletransは無制限の GoogleAPIを実装翻訳Pythonライブラリ。これは、Google Translate Ajax APIを使用して、検出や翻訳などのメソッドを呼び出します。これは凄い!

googletrans · PyPI

コード

from googletrans import Translator
translator = Translator()

text='''
The Laravel framework has a few system requirements. All of these requirements are satisfied by the Laravel Homestead virtual machine, so it's highly recommended that you use Homestead as your local Laravel development environment.

However, if you are not using Homestead, you will need to make sure your server meets the following requirements:
'''

translated = translator.translate(text, dest="ja");
print(translated.text)

実行結果

Laravelフレームワークにはいくつかのシステム要件があります。これらの要件はすべてLaravel Homestead仮想マシンによって満たされるため、ローカルのLaravel開発環境としてHomesteadを使用することを強くお勧めします。

ただし、ホームステッドを使用していない場合は、サーバーが次の要件を満たしていることを確認する必要があります。

LaravelでVue.jsを利用する

make:authが利用できなくなっていた

- 久しぶりに触ったら、make:authのコマンドがなくなっていた

$ php artisan make:auth

                                    
  Command "make:auth" is not defined.  
                                       
  Did you mean one of these?           
      make:cast                        
      make:channel                     
      make:command                     
      make:component                   
      make:controller                  
      make:event                       
      make:exception                   
      make:factory                     
      make:job                         
      make:listener                    
      make:mail                        
      make:middleware                  
      make:migration                   
      make:model                       
      make:notification                
      make:observer                    
      make:policy                      
      make:provider                    
      make:request                     
      make:resource                    
      make:rule                        
      make:seeder                      
      make:test                                                            

nvm インストール

$ curl -o- https://raw.githubusercontent.com/nvm-sh/nvm/v0.35.3/install.sh | bash
$ . ~/.nvm/nvm.sh
$ nvm install node
$ node -e "console.log('Running Node.js ' + process.version)"
Running Node.js v14.12.0

https://github.com/nvm-sh/nvm https://docs.aws.amazon.com/ja_jp/sdk-for-javascript/v2/developer-guide/setting-up-node-on-ec2-instance.html

LaravelとNPMの依存関係をインストールする

  • フロントエンドの依存関係をインストールします。
composer require laravel/ui
php artisan ui vue --auth
npm install

npm install vue-router vue-axios --save