はじめに
- docker環境のpythonでdiffusersを動かす。
インストールするパッケージ
- diffusersだけ動かすならdiffusersとpytorch_lightningだけでも良い
fastapi[all]
diffusers
transformers
accelerate
safetensors
omegaconf
pytorch_lightning
Dockerfile
- pytorchのインストールするコマンドは、各自の動作させる環境にあわせてコマンドを変える
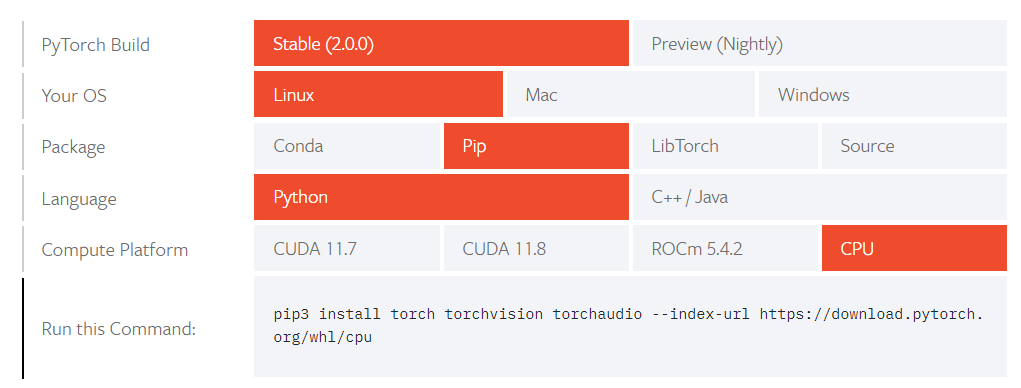
pytorch.org
FROM tiangolo/uvicorn-gunicorn-fastapi:latest

RUN apt-get update && \
    apt-get install -y libpq-dev gcc

WORKDIR /app

RUN python -m pip install --upgrade pip setuptools wheel

## pytorchのインストールするコマンドは環境にあわせてコマンドを変える
RUN pip3 install torch torchvision torchaudio --index-url https://download.pytorch.org/whl/cpu

COPY requirements.txt /app/requirements.txt

RUN pip install -r requirements.txt && \
    pip install diffusers
docker-compose.yaml
version: '3.9'
services:
  backend:
    container_name: backend
    build:
      context: ./backend
      dockerfile: Dockerfile
    ports:
      - "8000:8000"
    tty: true
    volumes:
      - ../backend:/app
    networks:
      - app-network
import torch
import datetime
from diffusers import StableDiffusionPipeline, DPMSolverMultistepScheduler
from diffusers.models import AutoencoderKL
# モデルの指定
model_id = "CompVis/stable-diffusion-v1-4"
if torch.cuda.is_available():
device = "cuda"
else:
device = "cpu"
# モデルの読み込み
pipe = StableDiffusionPipeline.from_pretrained(model_id)
# スケジューラーの設定
pipe.scheduler = DPMSolverMultistepScheduler.from_config(pipe.scheduler.config)
# デバイスの設定
pipe = pipe.to(device)
# 画像生成
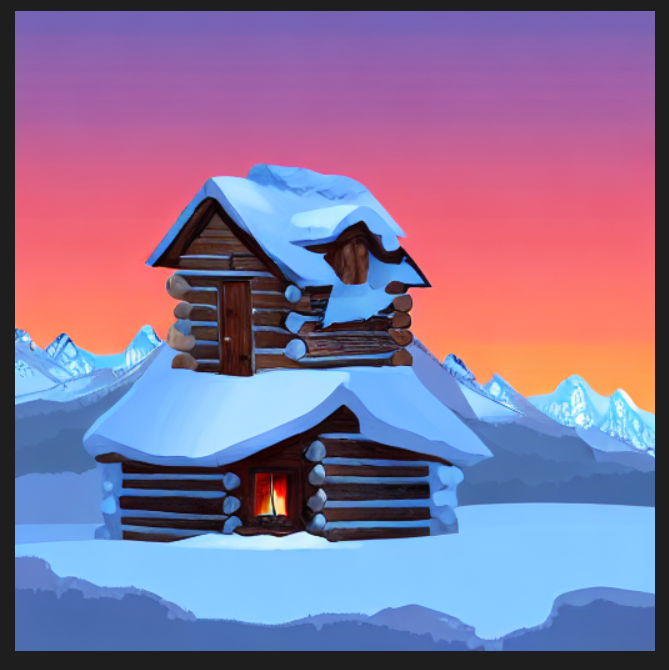
#
#例 payloadの値
# prompt='A small cabin on top of a snowy mountain in the style of Disney, artstation' negative='low quality, ugly' count=1 width=512 height=512 scale=7.5 steps=30 seedList=[5335531]
images_list = pipe(
[payload.prompt] * payload.count,
width=payload.width,
height=payload.height,
negative_prompt=[payload.negative] * payload.count,
guidance_scale=payload.scale,
num_inference_steps=payload.steps,
generator=generator_list,
)
images = []
# 画像を保存
for i, image in enumerate(images_list["images"]):
file_name = (
"./outputs/image_sample.png"
)
image.save(file_name)
images.append(image)
作成された画像
感想