はじめに
- 下記のページを参考に位置情報のサンプルを作成してみる developer.android.com
AndrodManifest.xml
ACCESS_COARSE_LOCATION
- 位置情報の精度に、街区を指定します。
ACCESS_FINE_LOCATION
    <uses-permission android:name="android.permission.ACCESS_FINE_LOCATION" />
    <uses-permission android:name="android.permission.ACCESS_COARSE_LOCATION"/>
    <uses-permission android:name="android.permission.INTERNET"/>
google maps keyの指定
    <application・・・>
            <meta-data
            android:name="com.google.android.geo.API_KEY"
            android:value="@string/google_maps_key" />
    </activity>
layout
- layout/activity_maps.xml
<?xml version="1.0" encoding="utf-8"?>
<fragment xmlns:android="http://schemas.android.com/apk/res/android"
    xmlns:map="http://schemas.android.com/apk/res-auto"
    xmlns:tools="http://schemas.android.com/tools"
    android:id="@+id/map"
    android:name="com.google.android.gms.maps.SupportMapFragment"
    android:layout_width="match_parent"
    android:layout_height="match_parent"
    tools:context=".MapsActivity" />
Activity
package biz.hogehoge.currentlocationonmap

import android.content.pm.PackageManager
import android.location.Geocoder
import android.location.Location
import androidx.appcompat.app.AppCompatActivity
import android.os.Bundle
import androidx.core.app.ActivityCompat
import com.google.android.gms.location.FusedLocationProviderClient
import com.google.android.gms.location.LocationServices

import com.google.android.gms.maps.CameraUpdateFactory
import com.google.android.gms.maps.GoogleMap
import com.google.android.gms.maps.OnMapReadyCallback
import com.google.android.gms.maps.SupportMapFragment
import com.google.android.gms.maps.model.LatLng
import com.google.android.gms.maps.model.Marker
import com.google.android.gms.maps.model.MarkerOptions
import java.io.IOException
import java.util.*

class MapsActivity : AppCompatActivity(), OnMapReadyCallback {
    var currentMarker: Marker? = null
    private lateinit var mMap: GoogleMap
    var fusedLocationProviderClient: FusedLocationProviderClient? = null
    var currentLocation: Location? = null

    override fun onCreate(savedInstanceState: Bundle?) {
        super.onCreate(savedInstanceState)
        setContentView(R.layout.activity_maps)
        // SupportMapFragmentを取得し、マップが使えるようになったら通知を受ける。
        fusedLocationProviderClient = LocationServices.getFusedLocationProviderClient(this)
        fetchLocation()
    }

    private fun fetchLocation() {
        // GPSのパーミッションの確認
        if(ActivityCompat.checkSelfPermission(this, android.Manifest.permission.ACCESS_FINE_LOCATION)
                    != PackageManager.PERMISSION_GRANTED && ActivityCompat.checkSelfPermission(this, android.Manifest.permission.ACCESS_COARSE_LOCATION)
            != PackageManager.PERMISSION_GRANTED) {

            ActivityCompat.requestPermissions(this, arrayOf(android.Manifest.permission.ACCESS_FINE_LOCATION), 1000)
            return
        }

        val task = fusedLocationProviderClient?.lastLocation
        task?.addOnSuccessListener { location->
            if(location != null ) {
                this.currentLocation = location
                val mapFragment = supportFragmentManager
                    .findFragmentById(R.id.map) as SupportMapFragment
                mapFragment.getMapAsync(this)
            }

        }

    }

    // GPSの許可ダイアログの承認結果を受け取る
    override fun onRequestPermissionsResult(
        requestCode: Int,
        permissions: Array<out String>,
        grantResults: IntArray
    ) {
       when(requestCode) {
           1000 -> if(grantResults.size > 0 && grantResults[0] == PackageManager.PERMISSION_GRANTED) {
               fetchLocation()
           }
       }
    }

    // 利用可能になったマップを操作します。
    // このコールバックは、マップが使用可能な状態になったときにトリガーされます。
    override fun onMapReady(googleMap: GoogleMap) {
        mMap = googleMap

        // シドニーにマーカーを追加し、カメラを動かす
        val sydney = LatLng(-34.0, 151.0)
        mMap.addMarker(MarkerOptions().position(sydney).title("Marker in Sydney"))
        mMap.moveCamera(CameraUpdateFactory.newLatLng(sydney))*/


        val latlong = LatLng(currentLocation?.latitude!!, currentLocation?.longitude!!)
        drawMarker(latlong)

        mMap.setOnMarkerDragListener(object: GoogleMap.OnMarkerDragListener {
            override fun onMarkerDrag(p0: Marker?) {

            }

            override fun onMarkerDragEnd(p0: Marker?) {
                if(currentMarker != null)
                    currentMarker?.remove()

                val newLatLng = LatLng(p0?.position!!.latitude, p0?.position.longitude)
                drawMarker(newLatLng)
            }

            override fun onMarkerDragStart(p0: Marker?) {

            }
        })
    }

    // マーカー表示hyouji
    private fun drawMarker(latlong : LatLng) {
        val markerOption = MarkerOptions().position(latlong).title("現在地")
            .snippet(getTheAddress(latlong.latitude, latlong.longitude)).draggable(true)

        mMap.animateCamera(CameraUpdateFactory.newLatLng(latlong))
        mMap.animateCamera(CameraUpdateFactory.newLatLngZoom(latlong, 15f))
        currentMarker = mMap.addMarker(markerOption)
        currentMarker?.showInfoWindow()
    }

    // 現在地取得
    private fun getTheAddress(latitude: Double, longitude: Double): String? {
        val geocoder = Geocoder(this, Locale.getDefault())
        val addresses = geocoder.getFromLocation(latitude, longitude, 1)
        if(addresses.size > 0 )
            return addresses[0].getAddressLine(0)
        return ""
    }
}
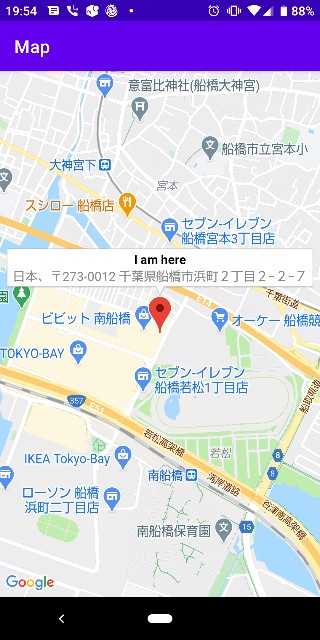
実行結果