フリーランス 技術調査ブログ

フリーランス/エンジニア Ruby Python Nodejs Vuejs React Dockerなどの調査技術調査の備忘録

nuxtjs/typscriptでコンポーネントを作成する

Options APIの場合

  • components/test.vueファイルを作成して下記のように記述する
<template>
    <div>
        Name: {{ fullName }}
        Message: {{ message }}
    </div>
</template>
<script lang="ts">
import Vue, { PropOptions } from 'vue'

interface User {
  firstName: string
  lastName: string
}

export default Vue.extend({
  name: 'YourComponent',

  props: {
    user: {
      type: Object,
      required: false
    } as PropOptions<User>
  },

  data () {
    return {
      message: 'This is a message'
    }
  },

  computed: {
    fullName (): string {
      return `${this.user.firstName} ${this.user.lastName}`
    }
  }
})
</script>
  • pages/index.vueに下記のように記述する
<template>
  <div class="container">
    <Test :user="user"/>
  </div>
</template>

<script>
import Test from '~/components/Test.vue'

export default {
  components: {
    Test
  },
  data() {
    return {
      user: {
        firstName: '太郎',
        lastName: '山田'
      }
    }
  },
}
</script>

Composition Apiの場合

  • plugins/composition-api.jsファイルに下記のように記述する
import Vue from 'vue'
import VueCompositionApi from '@vue/composition-api'

Vue.use(VueCompositionApi)
  • components/hoge.vueファイルを下記のように記述する
<template>
    <div>
        CNT: {{ count }}
        <button @click="increment">ボタン2</button>
    </div>
</template>
<script lang="ts">
import { defineComponent, ref } from '@vue/composition-api';

export default defineComponent({
  setup() {
    const count = ref(0);
    function increment() {
      count.value += 1;
    }
    return {
      count,
      increment,
    };
  },
});
</script>
  • pages/index.vueに下記のように記述する
<template>
  <div class="container">
    <Hoge />
  </div>
</template>

<script>
import Test from '~/components/Hoge.vue'

export default {
  components: {
    Hoge
  },
}
</script>

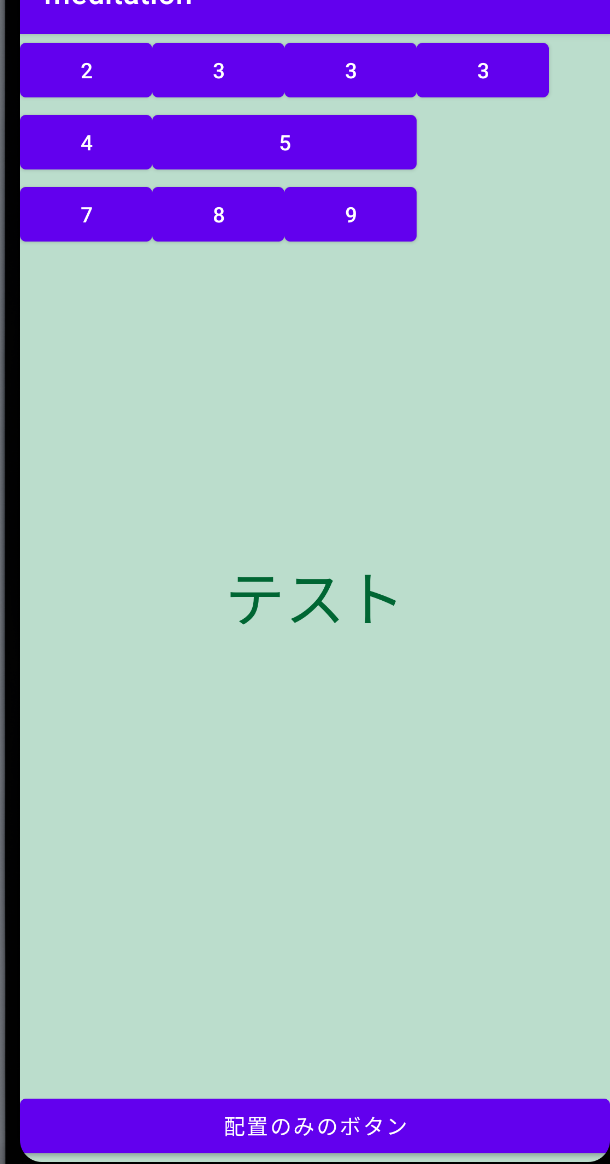
AndroidのTableLayout/LinearLayoutをインクルードする

作成した画面

f:id:PX-WING:20210318001628p:plain

activity_main.xml

  • このレイアウトがメインのxmlとなり、そのほかの3つのレイアウトファイルをincludeして読み込んでいる
<?xml version="1.0" encoding="utf-8"?>
<androidx.constraintlayout.widget.ConstraintLayout xmlns:android="http://schemas.android.com/apk/res/android"
    xmlns:app="http://schemas.android.com/apk/res-auto"
    xmlns:tools="http://schemas.android.com/tools"
    android:layout_width="match_parent"
    android:layout_height="match_parent"
    tools:context=".MainActivity">

    <TextView
        android:layout_width="wrap_content"
        android:layout_height="wrap_content"
        android:text="Hello World!"
        app:layout_constraintBottom_toBottomOf="parent"
        app:layout_constraintLeft_toLeftOf="parent"
        app:layout_constraintRight_toRightOf="parent"
        app:layout_constraintTop_toTopOf="parent" />

    <include layout="@layout/fragment_main" />
    <include layout="@layout/table_layout" />
    <include layout="@layout/linear_layout" />
</androidx.constraintlayout.widget.ConstraintLayout>

linear_layout.xml

<LinearLayout
    xmlns:android="http://schemas.android.com/apk/res/android"
    android:layout_width="match_parent"
    android:layout_height="match_parent"
    android:orientation="horizontal">

    <Button
        android:layout_width="match_parent"
        android:layout_height="wrap_content"
        android:layout_gravity="bottom"
        android:text="配置のみのボタン"/>

</LinearLayout>

table_layout.xml

<TableLayout
    xmlns:android="http://schemas.android.com/apk/res/android"
    android:layout_width="match_parent"
    android:layout_height="match_parent">

    <TableRow>
        <!-- layout_columnで左から2番目の位置を指定 -->
        <Button
            android:layout_width="wrap_content"
            android:layout_height="wrap_content"
            android:layout_column="0"
            android:text="2"/>

        <Button
            android:layout_width="wrap_content"
            android:layout_height="wrap_content"
            android:text="3"/>

        <Button
            android:layout_width="wrap_content"
            android:layout_height="wrap_content"
            android:text="3"/>

        <Button
            android:layout_width="wrap_content"
            android:layout_height="wrap_content"
            android:text="3"/>

    </TableRow>

    <TableRow>

        <Button
            android:layout_width="wrap_content"
            android:layout_height="wrap_content"
            android:text="4"/>
        <!-- 隣のセルと結合 -->
        <Button
            android:layout_width="wrap_content"
            android:layout_height="wrap_content"
            android:layout_span="2"
            android:text="5"/>
    </TableRow>

    <TableRow>

        <Button
            android:layout_width="wrap_content"
            android:layout_height="wrap_content"
            android:text="7"/>

        <Button
            android:layout_width="wrap_content"
            android:layout_height="wrap_content"
            android:text="8"/>

        <Button
            android:layout_width="wrap_content"
            android:layout_height="wrap_content"
            android:text="9"/>
    </TableRow>
</TableLayout>

fragment_main.xml

<?xml version="1.0" encoding="utf-8"?>
<LinearLayout
    xmlns:android="http://schemas.android.com/apk/res/android"
    android:layout_width="match_parent"
    android:layout_height="match_parent"
    android:background="#bdc"
    android:orientation="vertical"
    android:gravity="center" >

    <TextView
        android:text="テスト"
        android:layout_width="wrap_content"
        android:textSize="40sp"
        android:textColor="#063"
        android:layout_height="wrap_content"/>

</LinearLayout>

android/kotlin TODOアプリ 実装

はじめに

  • 前回,AndroidのTODOアプリのレイアウトを作成したので、今回は実装部分を書いてみる

px-wing.hatenablog.com

コード

  • MainActivityファイルの内容は下記のようにする
package biz.hoge.todolist
import android.graphics.Paint.STRIKE_THRU_TEXT_FLAG
import android.view.LayoutInflater
import android.view.View
import android.view.ViewGroup
import android.widget.TextView
import androidx.recyclerview.widget.RecyclerView
import kotlinx.android.synthetic.main.item_todo.view.*

class TodoAdapter(
        private val todos: MutableList<Todo>
) : RecyclerView.Adapter<TodoAdapter.TodoViewHolder>() {

    class TodoViewHolder(itemView: View) : RecyclerView.ViewHolder(itemView)

    override fun onCreateViewHolder(parent: ViewGroup, viewType: Int): TodoViewHolder {
        return TodoViewHolder(
                LayoutInflater.from(parent.context).inflate(
                        R.layout.item_todo,
                        parent,
                        false
                )
        )
    }

    fun addTodo(todo: Todo) {
        todos.add(todo)
        notifyItemInserted(todos.size - 1)
    }

    fun deleteDoneTodos() {
        todos.removeAll { todo ->
            todo.isChecked
        }
        notifyDataSetChanged()
    }

    private fun toggleStrikeThrough(tvTodoTitle: TextView, isChecked: Boolean) {
        if(isChecked) {
            tvTodoTitle.paintFlags = tvTodoTitle.paintFlags or STRIKE_THRU_TEXT_FLAG
        } else {
            tvTodoTitle.paintFlags = tvTodoTitle.paintFlags and STRIKE_THRU_TEXT_FLAG.inv()
        }
    }

    override fun onBindViewHolder(holder: TodoViewHolder, position: Int) {
        val curTodo = todos[position]
        holder.itemView.apply {
            tvTodoTitle.text = curTodo.title
            cbDone.isChecked = curTodo.isChecked
            toggleStrikeThrough(tvTodoTitle, curTodo.isChecked)
            cbDone.setOnCheckedChangeListener { _, isChecked ->
                toggleStrikeThrough(tvTodoTitle, isChecked)
                curTodo.isChecked = !curTodo.isChecked
            }
        }
    }

    override fun getItemCount(): Int {
        return todos.size
    }
}
  • ToDo.ktファイルを作成して下記のように記述する。データの型定義を指定する
package biz.hoge.todolist

data class Todo(
        val title: String,
        var isChecked: Boolean = false

)
  • TodoAdapter.ktファイルを作成して下記のように設定する
package biz.hoge.todolist
import android.graphics.Paint.STRIKE_THRU_TEXT_FLAG
import android.view.LayoutInflater
import android.view.View
import android.view.ViewGroup
import android.widget.TextView
import androidx.recyclerview.widget.RecyclerView
import kotlinx.android.synthetic.main.item_todo.view.*

class TodoAdapter(
        private val todos: MutableList<Todo>
) : RecyclerView.Adapter<TodoAdapter.TodoViewHolder>() {

    class TodoViewHolder(itemView: View) : RecyclerView.ViewHolder(itemView)

    override fun onCreateViewHolder(parent: ViewGroup, viewType: Int): TodoViewHolder {
        return TodoViewHolder(
                LayoutInflater.from(parent.context).inflate(
                        R.layout.item_todo,
                        parent,
                        false
                )
        )
    }

    fun addTodo(todo: Todo) {
        todos.add(todo)
        notifyItemInserted(todos.size - 1)
    }

    fun deleteDoneTodos() {
        todos.removeAll { todo ->
            todo.isChecked
        }
        notifyDataSetChanged()
    }

    private fun toggleStrikeThrough(tvTodoTitle: TextView, isChecked: Boolean) {
        if(isChecked) {
            tvTodoTitle.paintFlags = tvTodoTitle.paintFlags or STRIKE_THRU_TEXT_FLAG
        } else {
            tvTodoTitle.paintFlags = tvTodoTitle.paintFlags and STRIKE_THRU_TEXT_FLAG.inv()
        }
    }

    override fun onBindViewHolder(holder: TodoViewHolder, position: Int) {
        val curTodo = todos[position]
        holder.itemView.apply {
            tvTodoTitle.text = curTodo.title
            cbDone.isChecked = curTodo.isChecked
            toggleStrikeThrough(tvTodoTitle, curTodo.isChecked)
            cbDone.setOnCheckedChangeListener { _, isChecked ->
                toggleStrikeThrough(tvTodoTitle, isChecked)
                curTodo.isChecked = !curTodo.isChecked
            }
        }
    }

    override fun getItemCount(): Int {
        return todos.size
    }
}

android/kotlin TODOアプリ レイアウト

作成する画面

  • 今回は下記の画面をアプリを作成する。kotolin側の処理は次回に書きますが、今回はレイアウトのみ f:id:PX-WING:20210316001030p:plain

レイアウトファイル

activity_main.xml

<?xml version="1.0" encoding="utf-8"?>
<androidx.constraintlayout.widget.ConstraintLayout xmlns:android="http://schemas.android.com/apk/res/android"
    xmlns:app="http://schemas.android.com/apk/res-auto"
    xmlns:tools="http://schemas.android.com/tools"
    android:layout_width="match_parent"
    android:layout_height="match_parent"
    tools:context=".MainActivity">

    <androidx.recyclerview.widget.RecyclerView
        android:id="@+id/rvTodoItems"
        android:layout_width="match_parent"
        android:layout_height="0dp"
        app:layout_constraintBottom_toTopOf="@+id/etTodoTitle"
        app:layout_constraintEnd_toEndOf="parent"
        app:layout_constraintStart_toStartOf="parent"
        app:layout_constraintTop_toTopOf="parent" />

    <EditText
        android:id="@+id/etTodoTitle"
        android:layout_width="0dp"
        android:layout_height="wrap_content"
        android:hint="Enter Todo Title"
        app:layout_constraintBottom_toBottomOf="parent"
        app:layout_constraintEnd_toStartOf="@+id/btnAddTodo"
        app:layout_constraintStart_toStartOf="parent" />

    <Button
        android:id="@+id/btnAddTodo"
        android:layout_width="wrap_content"
        android:layout_height="wrap_content"
        android:text="Add Todo"
        app:layout_constraintBottom_toBottomOf="parent"
        app:layout_constraintEnd_toStartOf="@+id/btnDeleteDoneTodos" />

    <Button
        android:id="@+id/btnDeleteDoneTodos"
        android:layout_width="wrap_content"
        android:layout_height="wrap_content"
        android:text="Delete done"
        app:layout_constraintBottom_toBottomOf="parent"
        app:layout_constraintEnd_toEndOf="parent" />
</androidx.constraintlayout.widget.ConstraintLayout>

item_todo.xml

<?xml version="1.0" encoding="utf-8"?>
<androidx.constraintlayout.widget.ConstraintLayout
    xmlns:android="http://schemas.android.com/apk/res/android"
    xmlns:app="http://schemas.android.com/apk/res-auto"
    android:layout_width="match_parent"
    android:layout_height="80dp"
    android:paddingStart="8dp"
    android:paddingEnd="8dp">

    <TextView
        android:id="@+id/tvTodoTitle"
        android:layout_width="0dp"
        android:layout_height="wrap_content"
        android:text="Example"
        android:textSize="24sp"
        app:layout_constraintBottom_toBottomOf="parent"
        app:layout_constraintEnd_toStartOf="@+id/cbDone"
        app:layout_constraintStart_toStartOf="parent"
        app:layout_constraintTop_toTopOf="parent" />

    <CheckBox
        android:id="@+id/cbDone"
        android:layout_width="wrap_content"
        android:layout_height="wrap_content"
        app:layout_constraintBottom_toBottomOf="parent"
        app:layout_constraintEnd_toEndOf="parent"
        app:layout_constraintTop_toTopOf="parent" />

</androidx.constraintlayout.widget.ConstraintLayout>

nuxtjsでtypescriptを利用できるように設定してみる

参考ページ

  • 下記のサイトを参考に設定する

typescript.nuxtjs.org

typescriptの設定

  • インストール
# npm i @nuxt/typescript-build @nuxt/types @nuxt/typescript-runtime
  • nuxt.config.jsファイルのbuildModulesを下記のように修正する
  buildModules: [
    ['@nuxt/typescript-build', {
      typeCheck: true,
      ignoreNotFoundWarnings: true
    }]
  ],
  • tsconfig.jsonファイルを作成して下記のように記述する
{
  "compilerOptions": {
    "target": "ES2018",
    "module": "ESNext",
    "moduleResolution": "Node",
    "lib": [
      "ESNext",
      "ESNext.AsyncIterable",
      "DOM"
    ],
    "esModuleInterop": true,
    "allowJs": true,
    "sourceMap": true,
    "strict": true,
    "noEmit": true,
    "baseUrl": ".",
    "paths": {
      "~/*": [
        "./*"
      ],
      "@/*": [
        "./*"
      ]
    },
    "types": [
      "@types/node",
      "@nuxt/types"
    ]
  },
  "exclude": [
    "node_modules"
  ]
}
  • vue-shim.d.tsファイルを作成して下記のように記述する
declare module "*.vue" {
  import Vue from 'vue'
  export default Vue
}
  • package.jsonを下記のように変更する
"scripts": {
  "dev": "nuxt-ts",
  "build": "nuxt-ts build",
  "generate": "nuxt-ts generate",
  "start": "nuxt-ts start"
},

eslintの設定

  • インストール
# npm i -D @nuxtjs/eslint-config-typescript
  • .eslintrc.jsファイルを作成して下記の記述をする
module.exports = {
  extends: [
    '@nuxtjs/eslint-config-typescript'
  ]
}
  • package.jsonファイルのsciprtの箇所に下記の記述を追加する
  "scripts": {
    "lint": "eslint --ext .ts,.js,.vue ."
  },
vercelでnuxtjs環境を作ってみる

手順

  1. vercelの設定をする前に自分のgithubアカウントでvercel用のリポジトリを作成する。privateでもpublicでも大丈夫そう。

  2. vercelでアカウントを作成する。※githubアカウント連携 vercel.com

  3. vercelでアカウント作成後、ログインする。clone templateをnuxtjsを選択する f:id:PX-WING:20210313233811p:plain

  4. アカウント連携したgithubアカウントを選択する f:id:PX-WING:20210313233824p:plain

  5. githubを選択する f:id:PX-WING:20210313233832p:plain

  6. git scopeのプルダウンでAdd GitHub Org or Accountを選択する f:id:PX-WING:20210313233851p:plain

  7. 最初に作成したvercel用のリポジトリを選択し、installボタンをクリックする f:id:PX-WING:20210313233914p:plain

  8. プロジェクト名とフレームワークを指定してdeployボタンをクリックする。プロジェクト名がサブドメイン名になります。 f:id:PX-WING:20210313233927p:plain

  9. 下記の画面が表示されたら設定が完了 f:id:PX-WING:20210313233944p:plain

動作確認

  • ブラウザで指定のURLにアクセスするとデフォルトのページが表示される f:id:PX-WING:20210313234111p:plain

djangoを使用した英文スペルチェックと文法チェック

参考ページ

gingerit.readthedocs.io

インストール

python -m pip install gingerit

実装

  • templateファイルはテキストエリアとボタンのみを用意する
 {{message}}
    <form action="/" method="post">
        {% csrf_token %}
        <textarea name="txt"></textarea>
        <input type="submit" value="送信">
    </form>
  • views.pyファイルの中身は
from django.shortcuts import render
from django.http import HttpResponse
from gingerit.gingerit import GingerIt

def index(request):

    if request.method == "POST":
        text = request.POST.get('txt')
        parser = GingerIt()
        result_dict = parser.parse(text)
        params = {
            'message': result_dict["result"],
        }
    else:
        params = {'message': '英文を入力してください'}
    return render(request, 'index.html', params)

実行結果

  • 間違った下記の文章を
The smelt of fliwers bring back memories.

下記に変更してくれた

The smell of flowers brings back memories.

でも何パターンか試してみると、あまりにもスペルミスしていると違う単語に解釈されて微妙な感じでした。

 その他

  • スペルチェックや文法チェックのライブラリは他にもあった github.com

www.guru99.com